From Transcripts to Timelines: Rough Cuts with LLMs
I don’t particularly like nonlinear video editors, but over time I got used to handling Premiere Pro. Then Creative Cloud became too expensive for me. I have since switched to DaVinci Resolve — its free version does everything I need, and I haven’t felt the need for any “pro” features. Hey, I’ve even memorized some keyboard shortcuts, which help a lot during editing.
When I record videos of myself talking about something, I often struggle with the rough cut. I usually record several takes, and then it takes me a while to put everything together in the editor. Because I wanted to speed this up, I tested some LLM-based approaches, and here’s what I learned.
The main focus for me is always the content. A good take should have good words, you know? Now, if every word in the footage has a timestamp, you can not only have an LLM analyze your transcript, but also have it describe the edit as text, and turn that text into a timeline!
My workflow has five steps:
- Footage → transcripts with a timestamp per word
- Transcripts → a list of cuts (source file, in-point, out-point)
- List of cuts → a timeline file that Resolve can import
- Fine cut in Resolve → an exported timeline file
- Exported timeline and transcripts → subtitles for the final edit
Here is the entire pipeline that I used — but I should also tell you about ButterCut. It’s a Claude Code plugin that’s essentially a collection of tools and skills to make Claude your editing assistant. I haven’t explored its full potential yet (as I don’t like to adopt someone else’s workflow), but it has helpful conversion routines built in. In fact, it also does the transcription with Whisper for you, so perhaps just use ButterCut if you want to skip the gory details in this blog post.
Transcription first
I usually start by transcribing all of the original footage. I first tried .vtt subtitles, but standard subtitle files (.vtt or .srt) only have one time range per phrase. For fine-grained video editing, you need precise millisecond accuracy for every word. Here are some options:
-
WhisperX. It aligns the transcript with a phoneme model and writes each word’s
startandendtime to.segments[].words[]:whisperx footage.mp4 --language en --model small \ --compute_type float32 --device cpu \ --output_format json --output_dir transcripts -
whisper.cpp. It is free and open source and has experimental word-level timestamps. Its CLI accepts audio rather than video, so you have to first extract a mono WAV file.-ml 1creates one timed segment per word, and-ojfwrites the full JSON output:ffmpeg -i footage.mp4 -vn -ar 16000 -ac 1 footage.wav whisper-cli -m models/ggml-medium.en.bin -f footage.wav \ -l en -ml 1 -sow -ojf -of transcripts/footage -
The
mwCLI from MacWhisper, which is paid. Its JSON output has millisecondstartandendvalues in.segments[].words[]. JSON is already fully structured, so--style transcript --group wordsshould not be added:mw transcribe footage.mp4 \ --model parakeet-pro:nvidia_parakeet-v3_494MB \ --language en --format json --output transcripts/footage.json -
OpenAI’s speech-to-text API can return word timestamps with the
whisper-1model. This needsverbose_json; newer GPT transcription models only return plain JSON and do not support this option. I have not tried this route myself:openai audio:transcriptions create \ --file footage.mp4 --model whisper-1 \ --response-format verbose_json \ --timestamp-granularity word > transcripts/footage.json
You do need to carefully check the transcript. The smaller models in use by those tools might have trouble understanding acronyms or domain-specific jargon. I keep a list of corrections (for example, “ABC” → “IBC”) and apply it at the end. I usually don’t fix the transcripts by hand.
Another caveat is that some cameras start the audio track later than the video. At least that’s the case for my Android phone. So you always need to add the audio start offset to each word’s timestamp. ffprobe shows this offset as the audio stream’s start_time.
Rough cut assembly
I make the rough cut with Claude Code or Codex. The agent reads the transcripts of all takes and picks the best version of each passage. Best as in “most suitable for the task at hand” — which could be different depending on the video. In most cases I like the rough cuts, and the LLM is good at understanding repetitions and putting the narrative into a cohesive order.
The result is an edit decision list that, for now, lives inside the model’s context. For each segment, the model already knows the source file and the in- and out-points in milliseconds. Now it’s just a matter of persisting that edit list to a file, e.g. a list of clips with in- and out-points:
file,in,out
recording01.mp4,0.000,15.234
recording01.mp4,15.924,25.338
…
At first, I had the agent write the list as a shell script. The script ran ffmpeg -ss IN -t DURATION -i SOURCE for each segment and joined the pieces, which was useful for a quick review, but I soon realized I still had to refine things manually with a keyboard and mouse.
From cut list to Resolve timeline
So the question was how to get this roughly assembled timeline into something that DaVinci can resolve (see the joke I made?).
Luckily DaVinci can import Final Cut Pro XML (FCPXML) files (which I had never heard of before), so… let the LLM turn that edit list into FCPXML! Some gotchas:
- Each source file becomes an asset with its path, duration, frame rate, resolution, and starting timecode.
- Apply the audio shifts from the previous stage if needed.
- Times are fractions of seconds (e.g.,
830303/25s). They should fall on frame boundaries of the timeline’s frame rate. - Each clip’s offset is the sum of the durations of the clips before it.
- The timeline takes its resolution and frame rate from the footage.
- If clips have different frame rates, Resolve may import some of them as offline media. The older Final Cut Pro 7 XML format works better in that case.
Here, I didn’t actually invent anything new; I just used the export code from ButterCut, since it can write timelines in various formats.
Then, in DaVinci, import the timeline with File → Import → Timeline. That’s it. It’s so nice to just have your edit appear on screen.
The fine edit
In DaVinci, I then normalize the source audio. I select all audio clips (or select the leftmost, then press Y) and right-click to normalize.
Then, I fine-tune the edit. I move clip boundaries, add L- and J-cuts, and apply transitions and zooms. I like eased-in zooms, or jump cuts for increased attention. Basic YouTuber stuff, but give me a break — I don’t make money from it.
One thing I had to learn is that Resolve has no project files like Premiere does. It keeps projects in a database. You can technically export everything into a .drp file, but that’s only an exported copy. So, just save and forget about it.
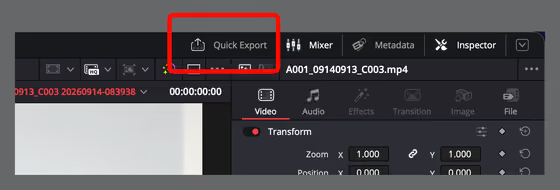
Once you are done, create a Quick Export (in the top right of the edit window).
Subtitling
This part is perhaps a bit hacky — I know subtitle tools exist, and DaVinci can probably do this on its own, but I like to be more flexible with transcription, which is where LLMs help as well.
Basically I have two styles for subtitles:
- Standard: two lines of up to 22 characters (for vertical video, up to 42 for horizontal), shown for at most four seconds.
- “TikTok-style”: one to three words at a time (one line of up to 14 characters), shown for at most 1.5 seconds, without commas or final periods.
Let the LLM generate them based on a transcription of the quick export, again using a Whisper-based tool.
To add the subtitles to the video:
- Import the
.srtwith File → Import → Subtitle - Drag it from the Media Pool onto the first frame of the timeline
- Note that only one subtitle track is ever active in DaVinci Resolve!
- Click the subtitle track header and open the Track tab in the Inspector
- The font, size, outline, background, and position you set there apply to all captions
An alternative approach could be to export the timeline with File → Export → Timeline → Final Cut Pro X 1.12 XML, and reassemble the subtitles from what was already transcribed for the individual segments. In that case, Resolve writes an .fcpxmld bundle; the actual XML is in its Info.fcpxml file. Now you can convert from the timeline back to a list of edits. I don’t really think that this is necessary though. While it saves another round-trip to a Whisper model, the assembly itself is error-prone.
Loudness
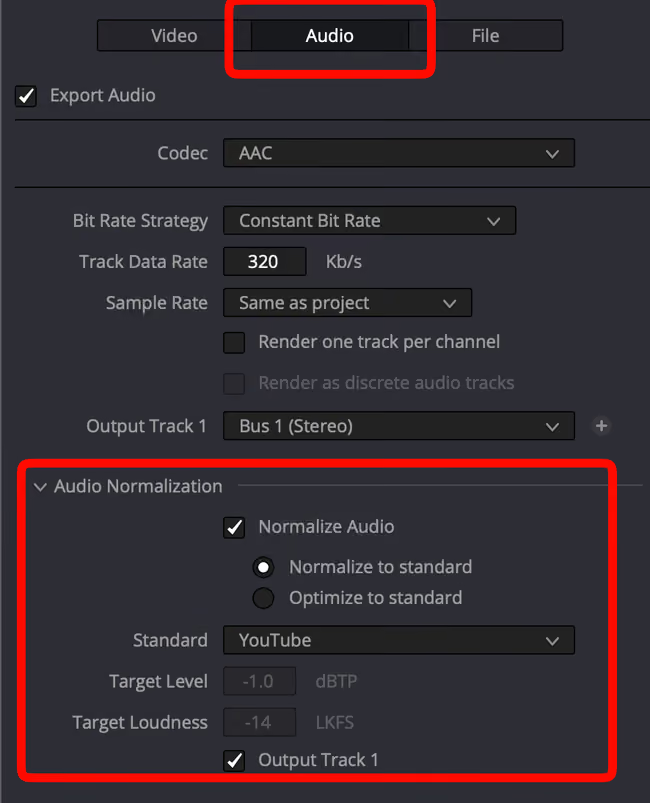
Before finally exporting, ensure that on the Deliver page, on the left-hand side, loudness normalization is enabled:
You could also fix the loudness with my own tool ffmpeg-normalize. It measures the loudness according to EBU R128, adjusts it in a second pass, and copies the video stream without re-encoding:
uvx ffmpeg-normalize video.mov -t -16 -tp -1.5 \
  -c:a aac -b:a 320k -ar 48000 --print-stats \
  -o video-normalized.mov
A target of -16 to -14 LUFS (loudness units) is reasonable for online video.
Summary
LLMs can help tremendously with video workflows. Transcripts and timelines are both “just” data, and the agent can easily work with that. What’s great is that it understands the semantics and goals of the video, rather than just removing stop words and fillers.
While I still do the actual editing and visual checks in Resolve, this approach helps me get to a final video much faster.