Understanding Rate Control Modes (x264, x265, vpx)
What is “rate control”? It’s what a video encoder does when it decides how many bits to spend for a given frame. The goal of (lossy) video encoding is to save as many bits as possible, reducing the file size over the original input file, while retaining as much quality as possible. Rate control is a crucial step in determining that tradeoff between size and quality.
Rate control comes in many forms—you’ll recognize the terms “1-pass” and “2-pass”, “CBR” and “VBR”, maybe you know about “VBV Encoding” or “CRF”.
Why should you care? Often enough, you see examples of video encoding commands that apply the wrong kind of rate control mode or wrong bitrates. This post is a brief guide on the different modes; it explains when you’d use which, as an end user. Note that this is not about the nitty-gritty details of Rate-Distortion Optimization.
Preamble: Variable vs. Constant Bitrate
Many people are more familiar with rate control in audio encoders, especially those who—like me—grew up with MP3s. To rip our CDs, we had been using Constant Bitrate (CBR) encoding for a while, when later, Variable Bitrate (VBR) encoding came along. Variable bitrate ensured that you’d achieve the lowest possible file size at the highest possible quality under the given constraints (as set by the VBR quality level).
Simply put, VBR lets the encoder use more bits for “stuff that is hard to encode” and save bits for the parts of the file that are easy to compress. What is hard and easy in terms of compression? Lots of motion in a video for example require more bits to encode, since the differences between adjacent video frames will be larger. High spatial details and complex textures are also hard to encode.
What is your encoding scenario?
Choosing a rate control mode strongly depends on your use case. In general, there are a number of different scenarios that all impact the way you should design your encoding pipeline:
- Archival — You want to compress a file for storing it in your archive, for example on an external hard drive or on your network storage. The file should have the best possible quality at the lowest possible file size, but you don’t care about the exact size.
- Streaming — You want to send a file over the Internet, using typical Video-on-Demand (VoD) streaming solutions such as HTTP progressive download or HTTP Adaptive Streaming. You need to make sure that the file doesn’t exceed a certain bitrate, or you need to provide different representations of the same file at different nominal bitrates (for Adaptive Streaming)
- Live Streaming — Like 2., but you want the encoding to be done as fast as possible, and you don’t have any knowledge of the content beforehand.
- Encoding for Devices — You want to put your file on a DVD, a Blu-ray, et cetera. You want to ensure that the file ends up having a certain size.
Knowing the scenario helps you choose a rate control mode.
Rate Control Modes
Now, let’s dive into the different modes. I will be basing my post on the modes supported by the popular H.264 and H.265 encoders x264 and x265, as well as libvpx, as available in ffmpeg. You can find more information on the options supported by the encoders in the documentation.
For x265, you may have to compile ffmpeg with --enable-libx265. With x265, not all parameters can be passed directly, so you have to use the -x265-params option. For libvpx, ffmpeg needs to be compiled with --enable-libvpx.
A word of caution: Encoders like x264 by default do not unnecessarily “stuff” frames with bits. This means that if you have a scene that is very easy to encode, your bitrate may always end up lower than the one you specified. Don’t worry about this—just keep in mind that there’s no point in achieving an exact target bitrate if it’s wasteful.
Constant QP (CQP)
The Quantization Parameter controls the amount of compression for every macroblock in a frame. Large values mean that there will be higher quantization, more compression, and lower quality. Lower values mean the opposite. QP ranges from 0 to 51 in H.264, and you can easily set a fixed QP for your entire encoding process with x264 and x265. Note: libvpx does not have a fixed QP mode.
ffmpeg -i <input> -c:v libx264 -qp 23 <output>
ffmpeg -i <input> -c:v libx265 -x265-params qp=23 <output>
To know more about the idea behind QP, you can read this tutorial (if you’re not afraid of some maths).
Unless you know what you’re doing and you explicitly want this, it is suggested not use this mode! Setting a fixed QP means that the resulting bitrate will be varying strongly depending on each scene’s complexity, and it will result in rather inefficient encodes for your input video. The quality will be good if you set a low enough QP, but in contrast to CRF (see below), you may waste space, or you have no control of the actual bitrate.
Good for: Video encoding research, or if you have no CRF mode
Bad for: Almost anything else
Note that Netflix proposes using fixed-QP encoding for its per-shot encoding optimization to achieve optimal encodes for each scene. This however requires a lot of processing and careful assembly of the individual encoded shots, so it’s not a “one size fits all” method you should use unless you have the whole framework implemented.
Average Bitrate (ABR, also “target bitrate”)
Here, we give the encoder a target bitrate and expect it to figure out how to reach that bitrate:
ffmpeg -i <input> -c:v libx264 -b:v 1M <output>
ffmpeg -i <input> -c:v libx265 -b:v 1M <output>
ffmpeg -i <input> -c:v libvpx-vp9 -b:v 1M <output>
Avoid using this mode! One of the main x264 developers himself says you should never use it. Why? As the encoder doesn’t know exactly what’s ahead in time, it will have to guess how to reach that bitrate. This means that the rate itself will vary, especially at the beginning of the clip, and at some point reach the target. Especially for HAS-type streaming, this leads to huge quality variations within short segments.
This is not a constant bitrate mode! While ABR is technically a VBR mode, it’s not much better than specifying a constant bitrate, in that it doesn’t reliably deliver good quality.
Good for: Quick (and dirty) encodes
Bad for: Almost anything
Constant Bitrate (CBR)
If it is a requirement for your use case, you can force the encoder to always use a certain bitrate. The bitrate will always be (roughly) the same, even if it is not needed. You can enable it for x264 by setting the nal-hrd option:
ffmpeg -i <input> -c:v libx264 -x264-params "nal-hrd=cbr:force-cfr=1" -b:v 1M -minrate 1M -maxrate 1M -bufsize 2M <output>
The output file needs to be .ts (MPEG-2 TS), since MP4 does not support NAL stuffing. Note that this mode will waste bandwidth if your source is easy to encode, but it ensures that the bitrate stays constant over your entire stream. You will find some more notes here. Use of this mode may make sense in some applications, but you generally want to allow streams to use a lower bitrate when possible.
For VP9, you need this:
ffmpeg -i <input> -c:v libvpx-vp9 -b:v 1M -maxrate 1M -minrate 1M <output>
Good for: Keeping a constant bitrate (duh); video streaming (e.g. Twitch)
Bad for: Archival; efficient use of bandwith
2-Pass Average Bitrate (2-Pass ABR)
Allowing the encoder to do two passes (or more) makes it possible for it to estimate what’s ahead in time. It can calculate the cost of encoding a frame in the first pass and then, in the second pass, more efficiently use the bits available. This ensures that the output quality is the best under a certain bitrate constraint. It will also mean that the bitrate will vary a bit over time, which is why this mode can also be called Variable Bitrate (VBR), although this is a bit of an ambiguous term.
Enable it for x264 with:
ffmpeg -i <input> -c:v libx264 -b:v 1M -pass 1 -f null /dev/null
ffmpeg -i <input> -c:v libx264 -b:v 1M -pass 2 <output>.mp4
For x265, replace libx264 with libx265 and set the pass option in the private options field:
ffmpeg -i <input> -c:v libx265 -b:v 1M -x265-params pass=1 -f null /dev/null
ffmpeg -i <input> -c:v libx265 -b:v 1M -x265-params pass=2 <output>.mp4
For VP9, it’s like for x264:
ffmpeg -i <input> -c:v libvpx-vp9 -b:v 1M -pass 1 -f null /dev/null
ffmpeg -i <input> -c:v libvpx-vp9 -b:v 1M -pass 2 <output>.webm
This is the easiest way to encode a file for streaming. With two caveats: You don’t know what the resulting quality will be, so you will have to do some tests to make sure that your bitrate is actually high enough for some complex contents. Another downside of this mode is that there may be local spikes in bitrate, meaning you may send more than your client can receive. As for choosing bitrates, YouTube gives you recommendations on settings for uploads, but keep in mind that those are optimized for having you upload good quality, so in practice you can choose lower bitrates, too.
Good for: Reaching a certain target bitrate; encoding for devices
Bad for: If you need quick encoding (e.g., live streaming)
Constant Quality (CQ) / Constant Rate Factor (CRF)
I’ve talked about the Constant Rate Factor in another article in more detail. It basically gives you constant quality throughout your encoding process. It’s a “set and forget” thing—just specify the CRF and let the encoder do the rest.
ffmpeg -i <input> -c:v libx264 -crf 23 <output>
ffmpeg -i <input> -c:v libx265 -crf 28 <output>
ffmpeg -i <input> -c:v libvpx-vp9 -crf 30 -b:v 0 <output>
In H.264 and H.265, CRF ranges from 0 to 51 (like the QP). 23 is a good default for x264, and 28 is the default for x265. 18 (or 24 for x265) should be visually transparent; anything lower will probably just waste file size. Values of ±6 will result in about half or twice the original bitrate. For VP9, the CRF can be from 0 to 63. Recommended values are from 15–35.
The only downside with this mode is that you don’t know what the resulting file size or the fluctuation of the bitrate will be.
Note that a two-pass and CRF encode with the same resulting bitrates should be identical in quality. The main difference is that with two-pass, you can control the file size (if that is a requirement), whereas with CRF you just specify the quality you want.
Good for: Archival; achieving the best possible quality
Bad for: Streaming; obtaining a certain bitrate / file size
Constrained Encoding (VBV)
The Video Buffering Verifier provides a way to ensure that the bitrate is constrained to a certain maximum. This is useful for streaming, as you can now be certain that you won’t send more bits than you promised within a certain time frame. VBV can be used both with 2-pass VBR (use it in both passes), or with CRF encoding—it can be “added” to the already presented rate control modes. The latter mode is also called “capped CRF”.
Turn on VBV with the -maxrate and -bufsize options to set the maximum bitrate and the expected client buffer size:
ffmpeg -i <input> -c:v libx264 -crf 23 -maxrate 1M -bufsize 2M <output>
ffmpeg -i <input> -c:v libx265 -crf 28 -x265-params vbv-maxrate=1000:vbv-bufsize=2000 <output>
VP9 has a similar mode, not called VBV, but with the same idea behind it:
ffmpeg -i <input> -c:v libvpx-vp9 -crf 30 -b:v 2M <output>
Note: If you do this for a live streaming application and you want to speed up the encoding process, with x264 and x265 you can add the -tune zerolatency and -preset ultrafast options. They reduce the quality you get for a certain bitrate (i.e., compression efficiency), but significantly speed up the process. For libvpx-vp9, you want to set -quality realtime and -speed 5. See the H.264 and VP9 guides for more info.
To use this approach with constrained ABR-VBV encoding:
ffmpeg -i <input> -c:v libx264 -b:v 1M -maxrate 1M -bufsize 2M -pass 1 -f null /dev/null
ffmpeg -i <input> -c:v libx264 -b:v 1M -maxrate 1M -bufsize 2M -pass 2 <output>
For x265:
ffmpeg -i <input> -c:v libx265 -b:v 1M -x265-params pass=1:vbv-maxrate=1000:vbv-bufsize=2000 -f null /dev/null
ffmpeg -i <input> -c:v libx265 -b:v 1M -x265-params pass=2:vbv-maxrate=1000:vbv-bufsize=2000 <output>
For VP9:
ffmpeg -i <input> -c:v libvpx-vp9 -b:v 1M -maxrate 1M -bufsize 2M -pass 1 -f null /dev/null
ffmpeg -i <input> -c:v libvpx-vp9 -b:v 1M -maxrate 1M -bufsize 2M -pass 2 <output>
Note: Here a one-pass approach can also be used, which—according to the x264 developer—is often as good as two passes, but it won’t compress the clip as efficiently.
How should you set the bufsize? This depends on how much variability you want in the bitrate. A good default is to have the buffer size be twice as large as the maximum rate, but suggestions may vary depending on the streaming setup. If your client buffer is smaller (in the order of just a few seconds), your bufsize should be around the same size as the maxrate. If you want to constrain your stream’s bitrate, try setting bufsize to half of the maximum rate or less.
When you apply VBV to CRF encoding, the trick is to find a CRF value that, on average, results in your desired maximum bitrate, but not more. If your encode always “maxes out” your maximum bitrate, your CRF was probably set too low. In such a case the encoder tries to spend bits it doesn’t have. On the other hand, if you have a high CRF that makes the bitrate not always hit the maximum, you could still lower it to gain some quality. For example, you encode at CRF 18 without VBV. Your clip ends up with an average bitrate of 3.0 Mbit/s. But your want your VBV setting to cap the clip at 1.5 Mbit/s, so you need to increase your CRF to about 24 to only get half the bitrate.
Good for: Streaming under bandwith constraints; live streaming (with CRF, 1-pass); VoD streaming (with target bitrate, 2-pass)
Bad for: People who want to play around; archival
Comparison Example
Here’s a quick comparison between the different rate control algorithmns. I took the free Big Buck Bunny and Tears of Steel video sequences and selected three different parts (of 30 seconds length) each. Note that these sequences are uncompressed, raw footage. The videos were then encoded with libx264 and its default settings. The only thing that was varied was the different rate control modes. I set different target bitrates (750, 1500, 3000, 7500 kbit/s) and maximum rates (for VBV) and QP/CRF values (17, 23, 29, 35). You can find the scripts used for the comparison on GitHub.
Note that this comparison is by no means exhaustive or fully representative. Typically you want to try many different sequences of various genres as well as different encoders. I am planning to update these tests in the near future. Still, these tests should give you an idea on what the different modes do.
Let’s start with the different bitrate control modes. The left column is for 3000 kbit/s, the right for 7500 kbit/s. I excluded the other target bitrates since they did not show strong differences in the graphs, since the bitrate is already at such a low point that the encoder does not have a lot of choices on how to assign it. The rows are the different clips from Big Buck Bunny (BBB) and Tears of Steel (ToS). The line represents a LOESS smoothing over the individual frame sizes—it’s an indication of how the bitrate changes over the clip’s duration.
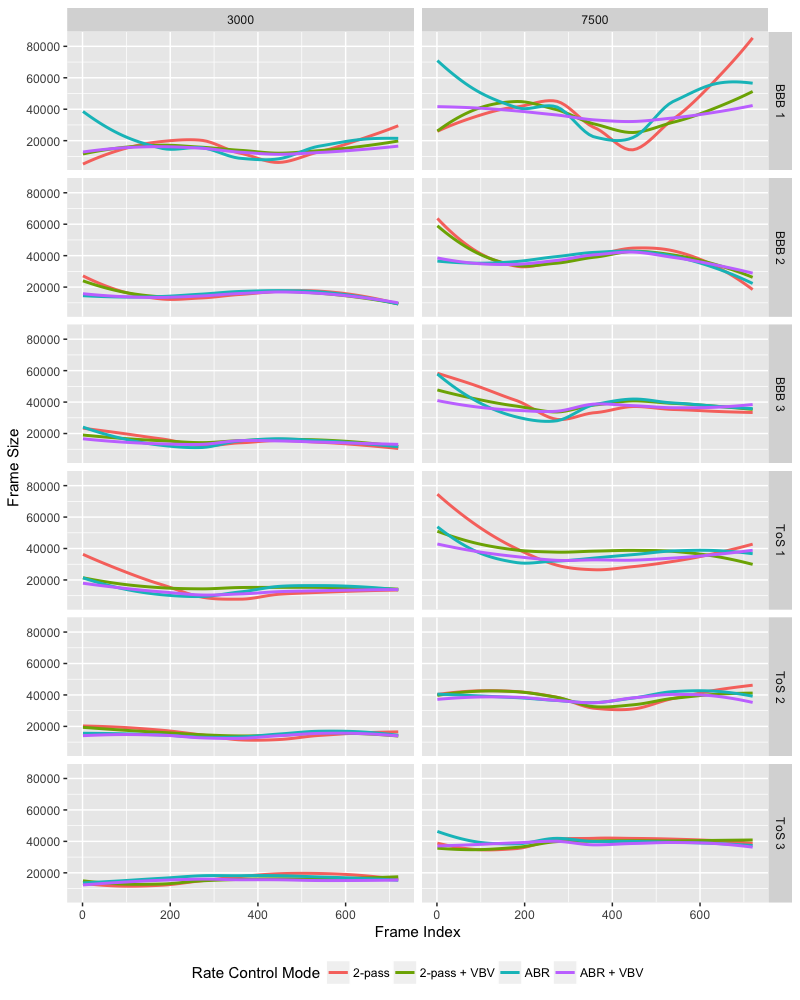
You can see that—especially for the first four contents—ABR (the turquoise line) and ABR+VBV (purple) wrongly estimate the clip’s complexity. In fact, the Big Buck Bunny sequence starts with a fade-in, smooth gradients and low motion, which means that not many bits are needed to compress it with good enough quality. The 2-pass approach correctly starts with a lower bitrate and saves bandwith. The last third of the video clip contains lots of spatial details, which makes the 2-pass mode use up more of the bits that it saved in the beginning.
For the second Big Buck Bunny clip, the different encoding modes actually align better than expected, although again it is visible how 2-pass causes a more extreme variation in bitrate than with the other modes.
Of course, there are also clips that are so easy to encode (or that have little variation in complexity). Here, the rate control modes do not differ that much.
For the quality-based modes (CQP and CRF), I only show the results from CRF/QP 17 and 23, which are at the “good” end of the quality range (just like 3000 and 7500 kbit/s are “good” values for full HD video). The order of the curves is inversed—lower means better quality:
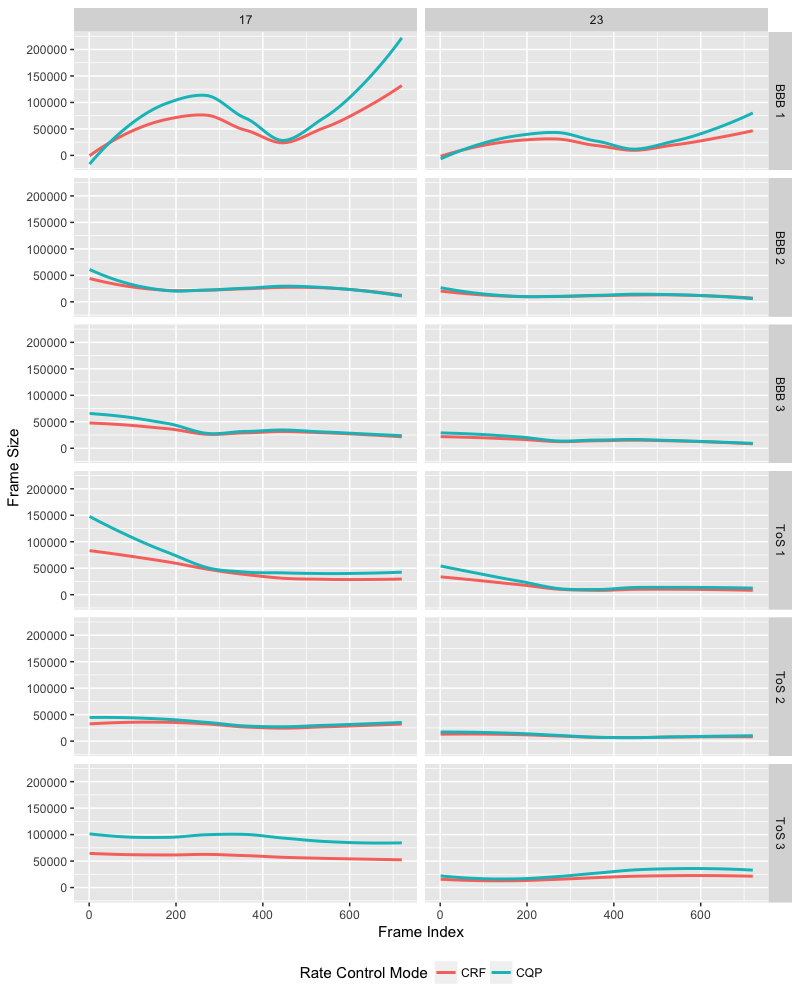
Here, the same trends as for 2-pass can be seen: the bitrate follows the content complexity. However, with CRF, it is more constrained, saving bits where they are not needed. The most interesting case is the bottom left: CRF saves bitrate over constant QP, as it usually does, but it does so in a constant offset. I would have to guess why this is the case—maybe this post will be updated with some further analyses.
Generally we can see how a CRF approach would nicely match the content, if only we could know beforehand what the resulting average bitrate would be… This is where CRF+VBV comes into play:
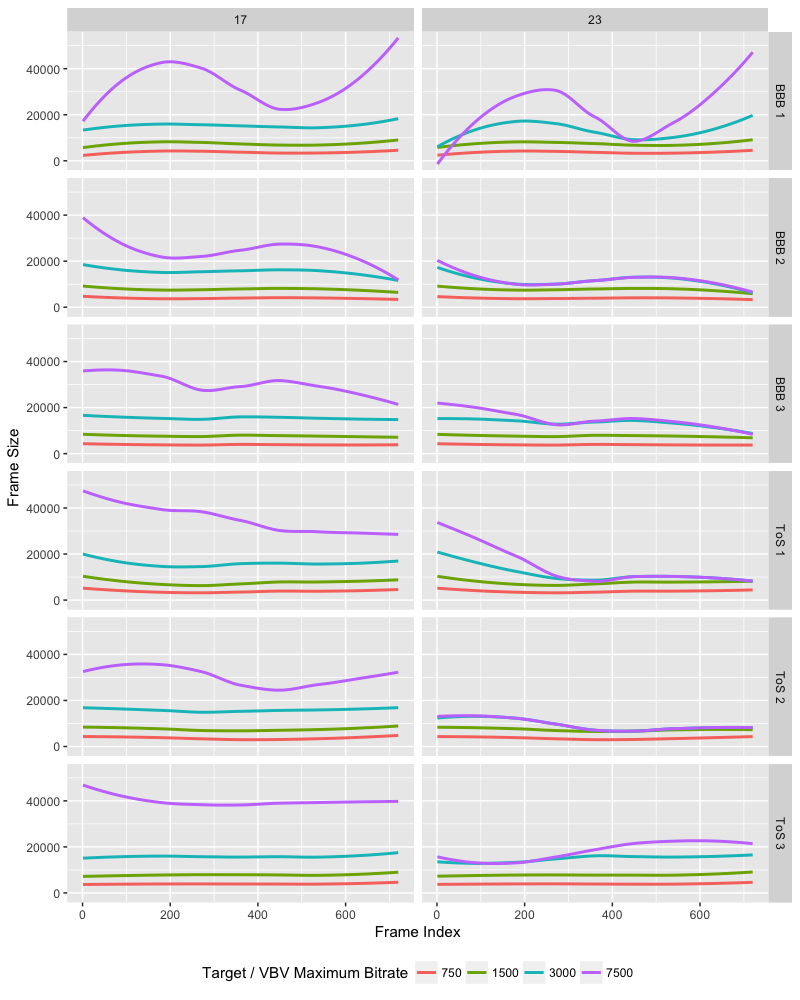
Choosing the correct target / maximum bitrate for a given CRF is often guesswork and depends entirely on the source video. However, when correctly done, you will not constrain the quality too much, pushing it to the limit (as in the case with 3000 kbit/s and CRF 17). You also don’t want to let the bitrate vary too much. CRF 23 is the default setting for libx264, and you can see that given a proper target bitrate setting (like 7500 kbit/s), this encoding mode would let the bitrate vary enough to account for differences in content complexity, still retaining compliance to the VBV model.
Wrap-Up
Making sense of the different rate control modes isn’t easy. Unfortunately, the most simple solution (just specifying bitrate) is one that isn’t recommended at all, but the Web keeps propagating code examples using this method.
To summarize, here’s what you should do, depending on your use case:
- Archival — CRF that gives you the quality you want.
- Streaming — Two-pass CRF or ABR with VBV-constained bitrate.
- Live Streaming — One-pass CRF or ABR with VBV-constained bitrate, or CBR if you can waste bits.
- Encoding for Devices — Two-pass ABR, typically.
Some more reading material:
- Handbrake Wiki: Constant Quality vs Average Bit Rate
- FFmpeg H.264 Encoding Guide
- x264-devel Mailing List: Making sense out of x264 rate control modes
- Video Encoding Settings for H.264 Excellence
- A qualitative overview of x264’s ratecontrol methods
- Google: VP9 Bitrate Modes in Detail
- Streaming Learning Center: Saving on Encoding and Streaming: Deploy Capped CRF